Applying rights protection to a file
You can apply either user-defined rights protection or company-defined rights protection a file. User-defined rights protection enables you to customize permissions according to your specific needs. Company-defined permissions use pre-built permissions established by your organization's policies.
-
Select a file location.
- Local drive
- MySpace
- Repositories
- Click a file to select it.
-
Click Proceed.
The Create protected file dialog box appears with the Specify permissions to the file section.
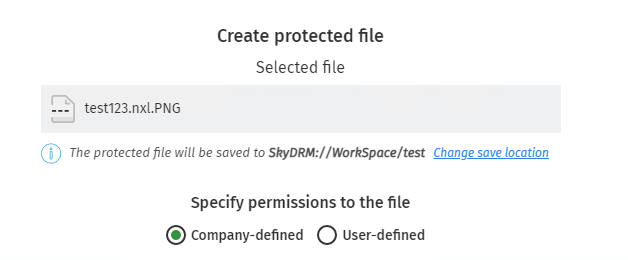
- To change the file's save location, click Change save location. For more information, see Changing save location.
-
Under Specify permissions to the file section, choose one of the
following permissions:
- Company-definedNote: The company-defined permissions may differ depending on your organization.
- User-defined
- Company-defined
- If you select Company-defined permissions, you can select preset permissions as defined by your organisation.
-
If you select User-defined permissions, you can select from the following options.
- View: Enables you to view a rights-protected file. This is selected by default and cannot be disabled.
- Print: Enables you to print a rights-protected file.
- Edit: Enables you to edit a rights-protected file.
- Save As: Enables you to save the rights-protected file.
- Re-share: Enables you to re-share a rights-protected file you received with other users.
- Watermark: Displays a watermark on a rights-protected file.Note: If you select Watermark, you can click Change to define a custom watermark.
- Expiration: Defines the expiration of the rights protection for the file.Note: If you select Expiration, you can click Change to define different rights protection validity period.
- Always valid: Access rights are always valid.
- Relative: Access rights are valid from a specific start date to an end date.
You can specify the number of years, months, weeks, and days for the validity period.
- Absolute date: Access rights are valid until a specific end date.
- Date range: Access rights are valid from a specific start date to an end date.
- Extract: Enables you to decrypt an NXL file and save as an original file.Note: You can select the Extract option, only if the destination spaces are WorkSpace or projects.
- Screen Capture: Enables you to take a screenshot of a rights-protected file.Note: You can select multiple permissions. For more permissions, click More options.
-
Click Create protected file.
A file with rights protection is created.
If the file already exists in the destination location, a message appears. Click one of the following options.
- Confirm: to continue to replace the file.
- Cancel: to cancel.